White Balance Photoshop Tips for Perfect Colors

When a photo’s colors look off, for example, your subject’s skin may seem too orange, or the snow in your image might appear bluish; the culprit is often white balance. In such cases, correcting this is one of the easiest yet most powerful steps you can take in post-processing. Moreover, when it comes to professional editing, white balance Photoshop adjustments give you complete control, allowing every image to look natural and consistent.
In this guide, we’ll break down what white balance means, why it matters, and exactly how to fix it in Photoshop. Whether you’re a beginner or a seasoned photographer, these tips will help you master accurate colors every time.
1. What Is White Balance in Photography?
White balance refers to the process of adjusting colors so that white objects appear white in a photo. This is because different light sources, like sunlight, tungsten bulbs, or fluorescent lamps – have different color temperatures. As a result, these temperatures affect the way your camera captures colors..
If the white balance is off, your photo might have a color cast:
- Warm cast: Orange or yellow tones
- Cool cast: Blue or cyan tones


Even the best cameras can misinterpret lighting conditions. That’s why adjusting white balance in Photoshop is so valuable; you can fix any color issues after shooting, no matter the original lighting.
2. Why Use Photoshop for White Balance Correction?
While many cameras let you set white balance manually, Photoshop offers flexibility that in-camera adjustments simply can’t match.
Here’s why professional editors prefer white balance Photoshop adjustments:
- Greater precision: You can fine-tune colors at the pixel level.
- Works on RAW and JPEG: RAW offers the most flexibility, but even JPEGs can benefit.
- Non-destructive editing: Using adjustment layers ensures your original image stays intact.
- Batch consistency: Apply the same settings across multiple photos for a cohesive look.
3. How to Adjust White Balance in Photoshop: Step-by-Step
There are several ways to correct white balance in Photoshop. Below are the most common and effective methods.
1. Using Camera Raw Filter
- Open your image in Photoshop.
- Go to Filter > Camera Raw Filter.
- In the Basic panel, locate the White Balance dropdown.
- Choose a preset (Auto, Daylight, Cloudy, etc.) or manually adjust Temperature and Tint sliders until colors look natural.
Watch at: How to Correct White Balance in Photoshop
Tip: Hold down the space bar to toggle between before and after views.
2. Using the Eyedropper Tool
- Add a Curves Adjustment Layer from the Adjustments panel.
- Select the white point eyedropper (right-most icon).
- Click on a part of your image that should be pure white or light gray.
- Photoshop will automatically shift the color balance based on that reference.
3. Adjusting Levels
- Add a Levels Adjustment Layer.
- Use the white and black point eyedroppers to set accurate highlights and shadows.
- Use the midtone slider to refine overall balance.
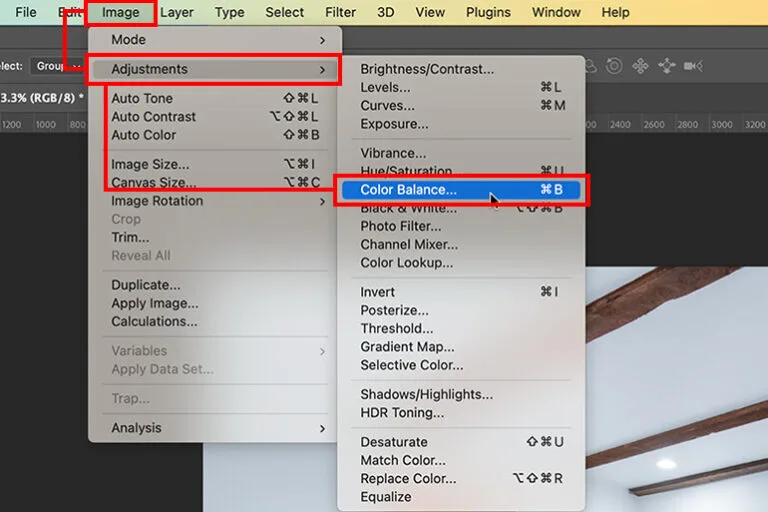
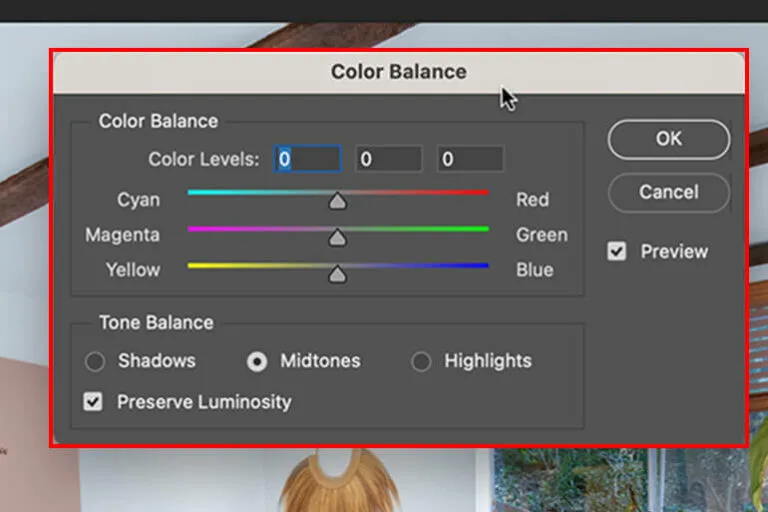
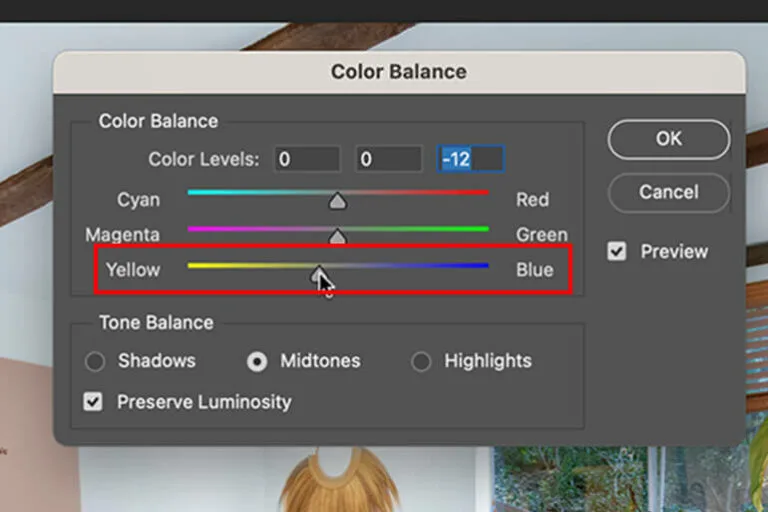
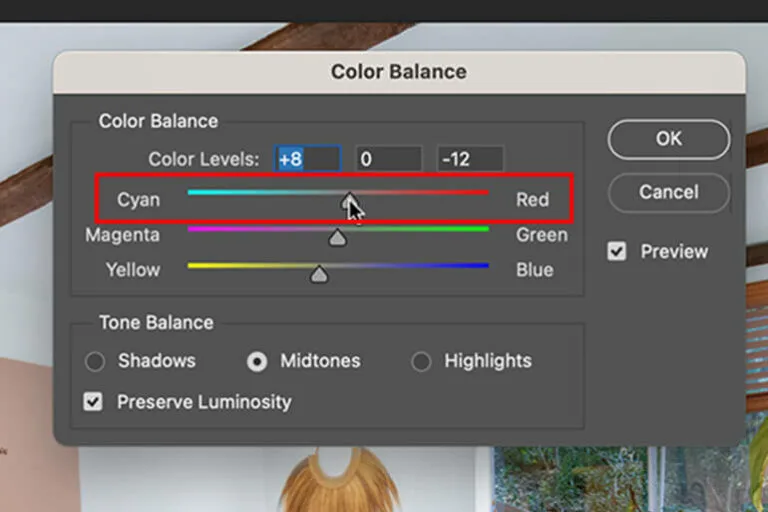
5. Selective Color Adjustments
For more advanced control, you can go to Image > Adjustments > Selective Color and tweak individual color channels. In doing so, this method becomes ideal for correcting specific hues while leaving the rest of the image unaffected.
4. Pro Tips for Perfect White Balance in Photoshop
Getting white balance right in Photoshop is easier when you follow these best practices:
- Shoot in RAW: It gives you maximum flexibility for post-processing.
- Use a gray card: Including one in your shots helps set an accurate reference.
- Check your monitor calibration: Editing on an uncalibrated screen can lead to inaccurate results.
- Don’t overcorrect: Too much adjustment can make images look unnatural.


5. Common White Balance Mistakes to Avoid
Even experienced editors make these white balance errors:
- Ignoring skin tones: A technically correct white balance might still make skin look strange. Adjust selectively for portraits.
- Over-saturation: Boosting vibrance after white balance correction can make colors too intense.
- One-click fixes without checking: Auto settings are a good starting point, but always fine-tune manually.
Conclusion
Correcting white balance in Photoshop isn’t just about fixing technical flaws; rather, it’s about making your images look authentic and professional. With the right adjustments, you can ensure that colors match what your eyes saw in real life, regardless of the original lighting conditions.
From Camera Raw tweaks to selective color adjustments, Photoshop offers endless ways to perfect white balance. Ultimately, once you master these tools, you’ll have the power to transform dull, color-shifted photos into vibrant, true-to-life images.
Read more:
How to Take Photos in Snow: Essential Tips and Techniques
A-Z Handbook: How To Make The Best Twilight Real Estate Photography
Best Free Real Estate Photo Editing Software for Stunning Property Images


